Background Check Connector
A background check vendor is a specialized vendor which allows you to define the underlying endpoints where requests are made. Requests and Responses to these external endpoints are well defined and can be validated against. Only one background check vendor can be integrated in your Cornerstone portal using the connector. Workflows in the UI as well as the business objects remain exactly the same.
Deep Dive
Background Check Workflow
- User requests a list of packages from the background check vendor.
- User selects a package from the list of available packages and starts a background check
- User is updated periodically regarding the status of the background check.
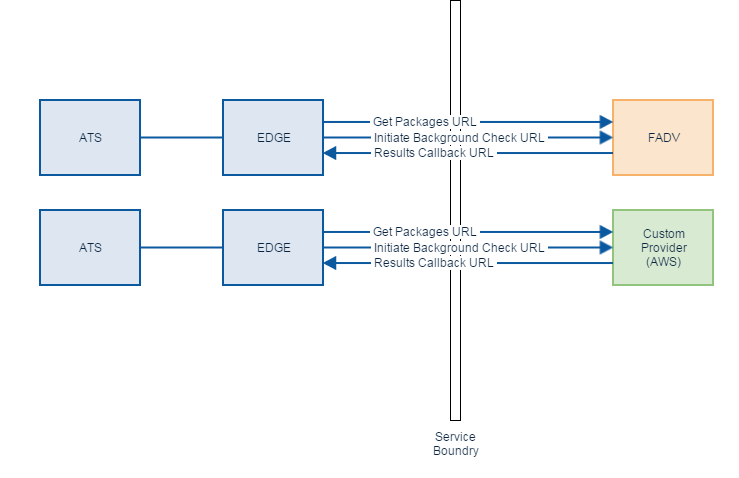
Background Check Workflow Behind the Scenes
Step 1: User requests a list of packages from the background check vendor.
- Edge makes a request to the External Service for packages using the user defined 'Packages Endpoint'
- External Service receives the request for packages and makes a request out to the vendor (this vendor can be anyone, FADV, Sterling, Accurate, etc) for a list of packages
- Vendor responds back with a list of packages to the External Service
- External Service formulates the vendor package response into a contract that Edge can understand
- Edge receives the list of packages from the External Service and displays it to the user
Step 2: User selects a package from the list of available packages and starts a background check.
- Edge makes a request to the External Service with the selected package, a callback URL, and the relevant user information for a background check to the user defined 'Initiate Background Check Endpoint'
- External Service receives the request for a background check and formulates the data from Edge into a contract that the vendor can understand. External Service also creates a unique GUID and associates it with the callback URL that Edge has provided
- External Service sends the background check request out to the vendor with the GUID as a response item that the vendor needs to return
- Vendor processes the request and either returns a unique reference ID for the background check or an error
- External Service receives the response from the vendor and formulates the correct response that Edge understands
- Edge receives the response from the External Service and updates the database with the reference id provided by the vendor
Step 3: User is updated periodically regarding the status of the background check
- Vendor sends a callback to the External Service regarding the status of the background check
- External Service receives the data and processes it, linking the GUID that the vendor provided to the unique callback URL that Edge provided
- External Service formulates the data into a contract that Edge can understand and sends it to Edge using the callback URL that Edge provided
- Edge receives the callback from the External Service and updates the background check status accordingly
Callback (Inbound)
Callback API Key
When posting data to callback endpoints, you must include an API key in your request header. This API key can be found in Integration Center in the configuration section of your integration.
Header: x-csod-edge-api-key:{API Key for your connector}
Functional Requirements
Upon installing the Background Check Connector through Edge, you will need to configure the items below in order to successfully set up your background check integration. For additional details on how to set up the background check integration in your Cornerstone portal, please refer to the starter guide.
Settings Page
- Username
- Password
- Base Service URL
Technical Specifications
For each background check vendor, a new external service needs to be created and implemented against the contracts as defined in the following documents:
- https://swaggerhub.com/apis/csodedge/Background-Check/
- https://swaggerhub.com/apis/csodedge/Background-Check-Callback/
Note: The external service needs to support TLS 1.2 for its communication with Cornerstone.
Testing and Verification
After installing and configuring the background check connector in your Cornerstone portal, you can test the integration by following the steps below. We strongly suggest validating the integration in either your stage or pilot environment prior to installing/enabling in the production environment.
Prerequisites:
- Your background check is set up and configured properly.
- Your background check is turned on within the Edge Integration Center.
- Your Cornerstone Client Account has access to the Recruiting Admin Page as well as the Manage Requisitions Page.
Create Custom Status - Set Custom Integration to "Custom Background Check"
- Navigate to Admin / Tools / Recruit / Applicant Statuses
- Navigate to the parent division you want to setup the status for.
- Click on Create Custom Status. A window should popup. Add a name and description to your custom status. Select Custom Integration for Type. Select Custom Background Check for Integration.
- Click on Save to close the Create Custom Status box. Navigate to the bottom of the Manage Applicant Statuses page and click on Save to save your changes.
Assign Custom Background Check Status to Job Requisition
- Navigate to Admin / Tools / Recruit / Requisition Templates
- Find the position you want to add the status to and click on the "Manage Requisition Templates" icon.
- Click on Add Template (or copy an existing template).
- After filling in necessary requisition details, click on the Status List "Edit" icon to edit the requisitions status list.
- Click the "+" icon to add the custom status you created to this job requisition.
- Click on Done and proceed with completing your job requisition template.
Assigning Custom Background Check to Applicant
- At this point, it is assumed that you have already posted the requisition you created and applied as an applicant via the career site. If you need assistance with this step, please check out Online Help.
- Change the status of the applicant to the custom background check status you created.
- Navigate to Manage Applicants for the requisition you posted and click on the applicant's name that you just applied with. Click on the "Statuses" tab, find the Custom Status, and click on "Assign to Applicant".
- On the Screening Program Option page that popped up, select the Custom Background Check Provider and select the package you wish to assign to the applicant. Click Submit. The status should show as "Acknowledged".
If you are able to assign a background check successfully you have validated that the integration setup is correct (username, password, packages and initiate background check endpoints). Once the applicant has completed the background check you can view the status of the applicant within the Manage Applicant page. Refresh the "Statuses" tab and if you can view a couple of different statuses that could include "In Progress", "Check Order Progress" or even "Completed". Once the background check has successfully been completed and a result has passed through, you should be able to see the Result and also click the "View Report" link to see how the candidate scored.
Sample Code
This is a base repository that you can clone and start building the external service. Please read the quick start to familiarize yourself.
This is the Swagger you should implement in the external service:
This is the contract you need to observe and send to Cornerstone Edge when making callbacks:
You can view an actual implementation based off FADV here: